Table of Contents
1. What is Linkly OnPrem?
Linkly OnPrem is a robust middleware solution specifically designed to seamlessly connect a Point of Sale (POS) system to a payment terminal via serial or USB connections. By acting as a bridge between the POS and terminal, it facilitates a secure and efficient payment processing environment. The solution ensures integrated communication between the two systems, enabling real-time transaction handling without interruptions. This integration not only enhances operational efficiency but also bolsters security by ensuring sensitive payment data is transmitted safely across the connection. Linkly OnPrem is ideal for businesses that require an on-premises, reliable, and straightforward payment solution that prioritises both speed and security in transaction processing.
2. How does it work?
- Socket Connection: The POS initiates a connection to the Linkly system by opening a TCP/IP socket, typically to the EFT-Client listening on port 2011. This port can be configured in the system registry if needed.
- Transaction Request: Once the socket is established, the POS sends a transaction request message through this connection.
- Event Handling: The POS monitors the socket for various events, including:
- Display Events: Indicate that the EFTPOS system is displaying information, which can be mirrored on customer-facing displays.
- Print Events: Signal the need to print receipts or other transaction-related documents.
- Final Response: After processing the transaction, the Linkly system sends a final response to the POS, indicating the outcome.
- Socket Closure: Upon receiving the final response, the POS can close the socket, completing the transaction cycle.
3. Why should I choose OnPrem?
Benefits include:
- Low Latency: Direct communication with local hardware/software ensures faster response times.
- Offline Capability: Suitable for environments where consistent internet connectivity is unavailable.
- Established Technology: Widely used and well-documented for Windows systems.
- Application Support: Integrate with Value Added Services.
- Feature support: Supports all of Linkly transaction types and features such as Tipping, Surcharging, MOTO, Preauth/Capture.
- SDK: POS can utilise the C# library for a hassle-free integration.
4. Where do I begin?
4.1 Review API documentation:
Link to API documentation: TCPIP
4.2 Terminal setup - Android terminal
If you are working with one of our partner acquirers, you can request them for a supported Android Debug Terminal or get one from the device manufacturer.
At this stage, we only support the following terminals to ensure the shortest go-to-market turnaround time:
| Device Type | Android Version |
| PAX A920 | 7 |
| PAX A920pro | 8, 10 |
| PAX A77 | 8 |
| PAX A910S | 10 |
| PAX A80 | 10 |
Note: A77 terminals do not have an integrated printer. The MPOS integrator must manage external printers or over-the-air receipts.
Refer to Android Setup Guide v2.0.pdf. This document is targeted toward PAX hardware, but the steps are similar to any Android device with Linkly Connect App.
4.3 Terminal setup - Ingenico Move 5000 terminal
Please refer here to set up Ingenico Move 5000 for OnPrem.
4.4 I don't have a physical terminal
You can utilise the Linkly Test harness and Offline Development applications if you don’t have a physical device. Here are the Installation Instructions for Linkly Software Offline Development: OnPrem Test Harness installation.
Configuration instructions for Virtual Pin Pad in OnPrem:
Steps to Enable OnPrem Mode on VPP:
| Step | Action |
| 1 | Click FUNC |
| 2 | Enter 7410 on the keypad |
| 3 | Click OK |
| 4 | On TERMINAL CONFIGURATION, click 0 on the keypad |
| 5 | On CLOUD MODE, click 0 on the keypad |
| 6 | Click OK |
| 7 | On CLIENT IP, enter 127.0.0.1 using the keypad |
| 8 | Click OK |
| 9 | On CLIENT PORT, enter 2012 using the keypad |
| 10 | Click OK |
| 11 | When asked, RE-CONNECT TO CLIENT?, click OK |
| 12 | Click CANCEL to return to the home screen |
| 13 | VPP is now in OnPrem mode |
Disable Virtual Pin Pad Auto Approve:
The VPP features transaction simulations using the cent value of the amount. For example, you can trigger Pin Pad signature prompts by transacting $10.08. This feature is controlled by a toggle called Auto Approve and its purpose is to allow all transactions to approve regardless of the cent value in the amount field.
If it’s required to simulate “approved” transactions with different cent values, please enable Auto Approve. However, for your accreditation test cases and simulating signature prompts and declines, please ensure Auto Approve is disabled to avoid incorrect results.
Auto Approve Settings:
| Auto Approve ENABLE | Auto Approve DISABLE |
| FUNC 7410 OK, 1, CLEAR, OK, CANCEL | FUNC 7410 OK, 1, CLEAR, CLEAR, CANCEL to return to the main screen |
5. POS software setup
5.1 I don’t have a POS software?
You can use the Linkly's IPTestPOS, which is a test POS software used for demonstration purposes.
If you have installed the Linkly Software for Offline Development (Refer to step 4.4) in the default installation directory, it will be in C:\PC_EFT\DevTools\
5.2 I have a POS Software?
If you already have POS software and want to integrate it with Linkly OnPrem, it's crucial to first test the API methods before making any changes to your POS software. This allows you to:
- Understand how the API works, including authentication, requests, and responses.
- Identify potential issues early, ensuring a smoother integration process.
- Validate functionality before implementing changes in your POS system.
Testing beforehand helps prevent errors and streamlines the development process.
Once you are ready to implement, refer to the API specifications and ensure your POS integration follows our guidelines and best practices.
6. What are the components of the Linkly Software?
Please refer to the User Guide for Linkly EFT-Client, EFT-Server, and EMS-Client software: Linkly Software User Guide
In general:
- The Client software interfaces with the POS Software, Eftpos Terminal, and the Eft-Server to communicate transaction details.
Linkly EFT-Server - The Server software contains the merchant’s user credentials in Production and enables communications to the Bank.
Linkly EMS Client - The diagnostic tool is used to check terminal connectivity and set up automatic background services, such as auto settlements.
7. Supported OS types for both OnPrem Solutions?
Windows only.
8. How do we trigger transaction simulations/errors?
Transaction simulations and error testing is done by setting the cent value of a transaction amount to a specific value. Linkly recognises these values and triggers the corresponding transaction flow/error from the predefined Response codes and Error Lists
- For example: If you configure the amount as $10.50, Linkly will return a “SYSTEM ERROR” response. If you set it to $10.08, it will trigger a Signature Verification flow.
9. Where can I find logs?
If Logs are stored locally. For OnPrem integrations, the Eftpos logs will be stored in ‘C:\PC_EFT’ labelled Eftpos.log, as shown below:
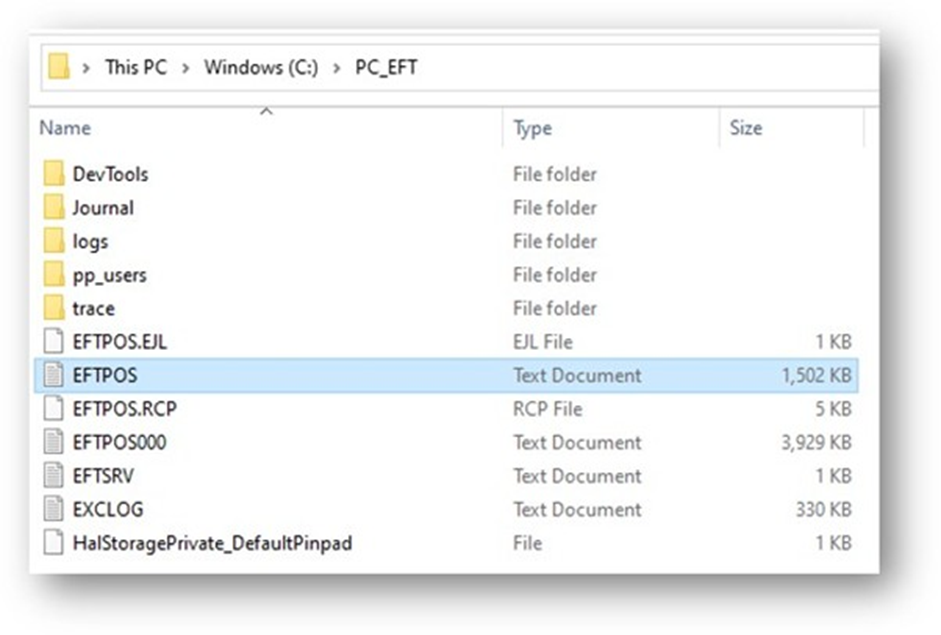
If the tests/transactions were processed from a particular date in the past, the log files will be available in ‘C:\PC_EFT\trace’.
10. OnPrem Surcharging
There are new tabs for Surcharging in the Linkly Client Control Panel. The merchant will be able to set their own values for surcharging. They can choose to use a Fixed amount (in cents) or a percentage of the overall transaction value.
To enable:
- Go to the EFT Client and click on Control Panel
- Click on the Surcharge tab on the top menu.
- Click on ‘Enable Surcharge’ to access the surcharge settings.
- Click on the card type you wish to adjust. This will open the Edit Surcharge Value window
- Select the Surcharge type (Fixed or Percentage) from the drop down and enter the surcharge value.
- Click ‘OK’ on the Edit Surcharge Value window.
- Click on 'Apply' to confirm the changes.

If a surcharge is applied, the following tags will appear in the Purchase Analysis Data (PAD) section of the transaction response:
• The SUR tag will be present in the purchaseAnalysisData TransactionEvent, and will contain the value of the surcharge applied in cents.
• The AMT tag will be present in the purchaseAnalysisData TransactionEvent, and will contain the total value of the sale (e.g. purchase amount + surcharge)